Googleスプレッドシートの入力フォームを作成する方法を記事にしました。
Googleスプレッドシートで大量のデータをまとめて入力したり、過去のデータを一行ずつチェックして修正したりするとき、セルに直接入力していませんか?
これ、ぶっちゃけ……横に長い表だと今どの行を触っているか見失いそうになりますし、何十件も続けて入力していると目が疲れて効率が落ちちゃいますよね!
そこで今回は、作業効率を向上させたくデータ入力フォームをGASで作成してみました!
Google Apps Script(GAS)を使って、スプレッドシートに『入力・修正専用のポップアップフォーム』を実装します!
これを使えば、フォームに文字を打ち込んでいくだけで、新規追加も、『今シートで選択している行のデータを自動で読み込んで一発修正』するのも簡単。
作業スピードが劇的に変わるので、ぜひ真似して作ってみてください!
新規登録フォーム作成
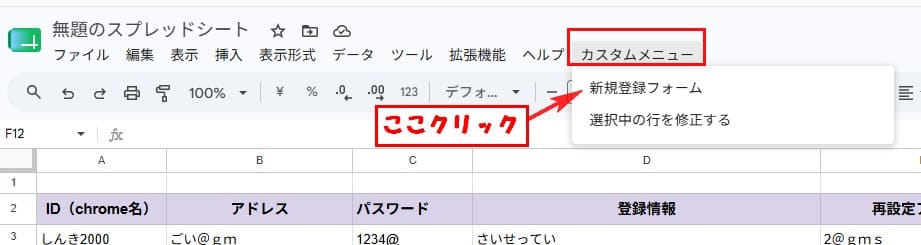
まずは実際の動きを見てみましょう。メニューから『新規登録フォーム』をクリックします。

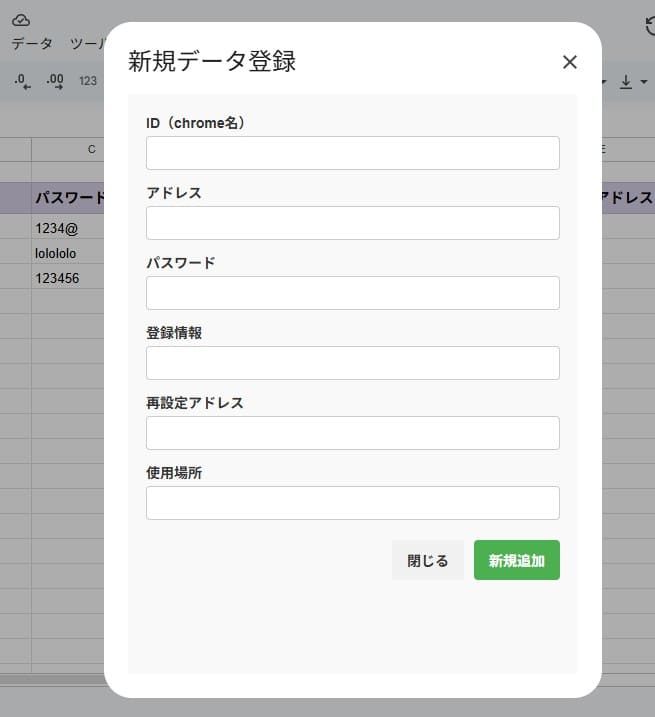
このように、ID、アドレス、パスワードなどが縦に並んだ画面で入力でき、入力内容がすべて一目でパッと確認でき入力が楽にできます。

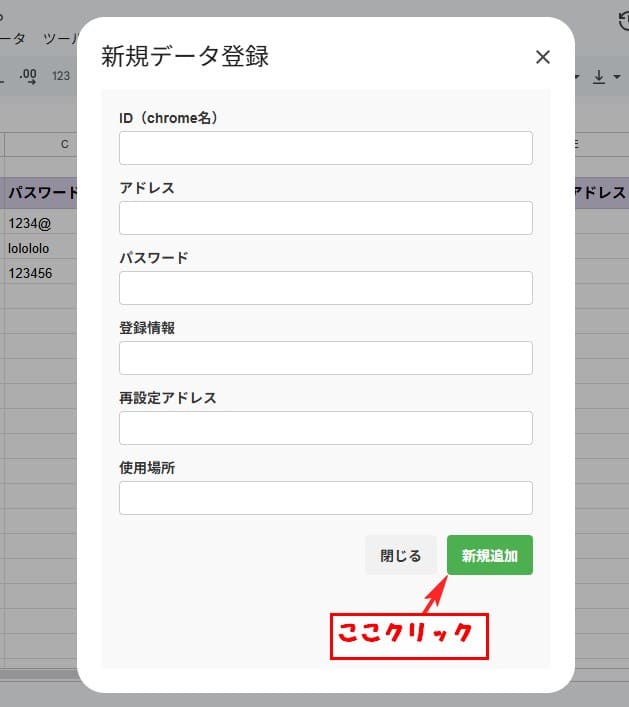
『新規追加』ボタンを押すと、シートの末尾行へ追加され、フォームは自動で空になります。
これなら、キーボードのTabキーでサクサク移動しながら、何件でもまとめて入力が可能です。

データの内容を変更
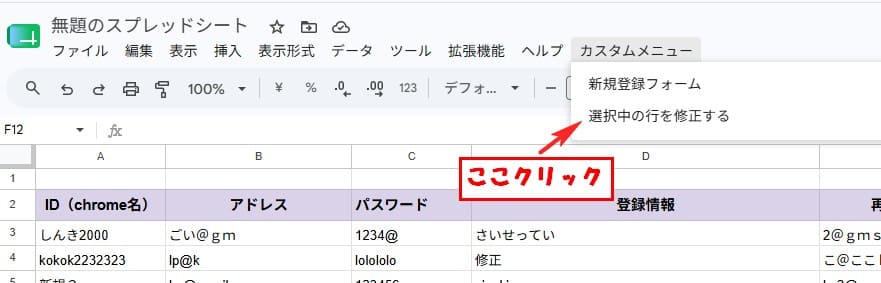
さらに便利なのが、こちらの修正機能です。修正したいデータの行をシート上で選択して、『選択中の行を修正する』をクリックします。

すると、いま選択した行のデータが最初から入った状態でフォームが立ち上がります!

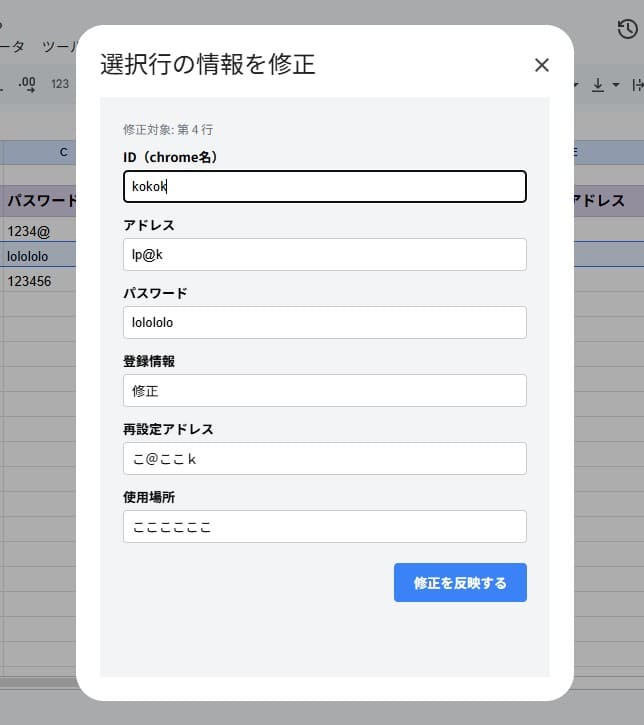
表を横にスクロールしながらセルを探す必要はありません。
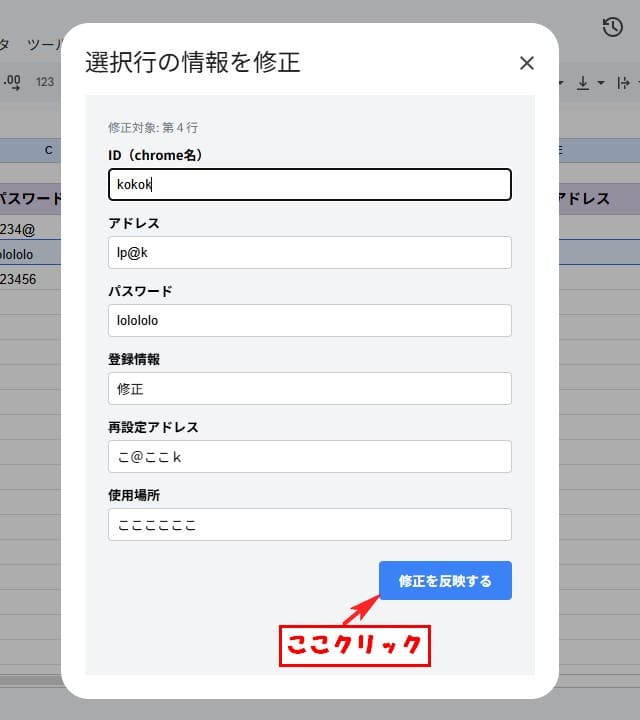
手元のフォーム上でサクッと書き換えて『修正を反映する』を押すだけで、元の行がきれいに上書きされます。
データのメンテナンスが簡単にできるようになります。

セルに直接ちまちま入力するよりも、専用フォームを使ったほうがまとめて作業するときの疲労感が全然違います。
リスト作成などのルーティンワークがある方はぜひ導入してみてください!
コード挿入方法
作り方はとっても簡単です。スプレッドシートの『拡張機能』から『Apps Script』をクリックします。

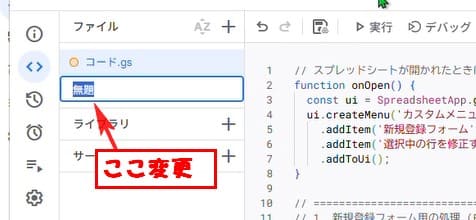
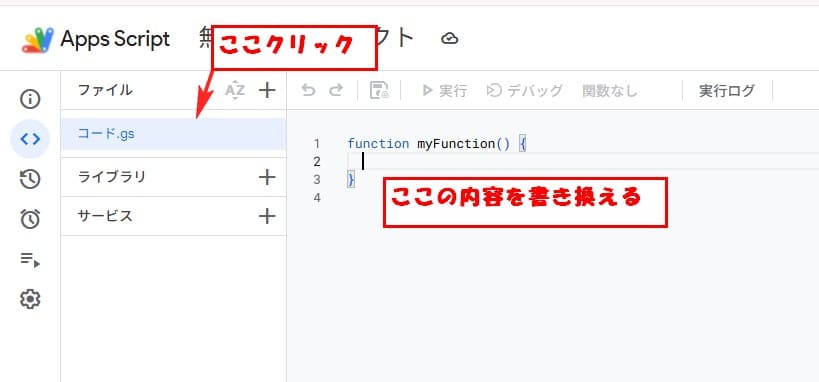
まずは『コード.gs』をクリックして中身をすべて、下記のコードに書き換えます。
コード.gsのコード
// スプレッドシートが開かれたときにカスタムメニューを追加する関数
function onOpen() {
  const ui = SpreadsheetApp.getUi();
  ui.createMenu('カスタムメニュー')
    .addItem('新規登録フォーム', 'showForm')       // Form.html を開く
    .addItem('選択中の行を修正する', 'showEditForm') // EditForm.html を開く
    .addToUi();
}

// ==========================================
// 1. 新規登録フォーム用の処理 (Form.html)
// ==========================================

// 新規登録フォームを表示
function showForm() {
  const htmlOutput = HtmlService.createHtmlOutputFromFile('Form')
      .setWidth(450)
      .setHeight(580)
      .setTitle('データ入力フォーム');
  SpreadsheetApp.getUi().showModalDialog(htmlOutput, '新規データ登録');
}

// データを末尾に追加
function addNewRow(formData) {
  const sheet = SpreadsheetApp.getActiveSpreadsheet().getActiveSheet();
  const rowData = [
    formData.chromeId,
    formData.address,
    formData.password,
    formData.info,
    formData.recoveryAddress,
    formData.location
  ];
  sheet.appendRow(rowData);
}


// ==========================================
// 2. 選択行の修正フォーム用の処理 (EditForm.html)
// ==========================================

// 修正用フォームを表示
function showEditForm() {
  const sheet = SpreadsheetApp.getActiveSpreadsheet().getActiveSheet();
  const activeRange = sheet.getActiveRange();
  const row = activeRange.getRow();

  // 見出し行のガード(1〜2行目の場合はエラー)
  if (row <= 2) {
    SpreadsheetApp.getUi().alert('修正したいデータの行を選択してください。');
    return;
  }

  // 選択行のA列からF列(1〜6列目)のデータを取得
  const rowData = sheet.getRange(row, 1, 1, 6).getValues()[0];

  // HTMLテンプレートを作成し、データを渡す
  const template = HtmlService.createTemplateFromFile('EditForm');
  template.rowData = rowData;
  template.rowNum = row;

  const html = template.evaluate()
      .setWidth(450)
      .setHeight(580)
      .setTitle('行データの修正');

  SpreadsheetApp.getUi().showModalDialog(html, '選択行の情報を修正');
}

// 修正内容を上書き保存
function saveEditedRow(formData) {
  const sheet = SpreadsheetApp.getActiveSpreadsheet().getActiveSheet();
  const row = parseInt(formData.rowNumber, 10); // 安全のため10進数で解析

  const rowData = [
    formData.chromeId,
    formData.address,
    formData.password,
    formData.info,
    formData.recoveryAddress,
    formData.location
  ];

  sheet.getRange(row, 1, 1, 6).setValues([rowData]);
}
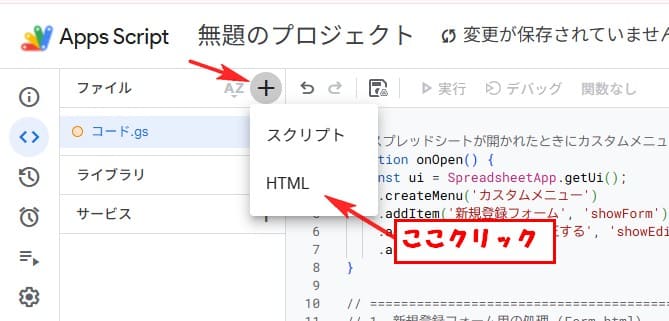
次に、左側のプラスボタンからHTMLファイルを2つ作ります。
1つ目は名前を『Form』にして新規登録用のHTMLを作成。2つ目は『EditForm』にして修正用のHTMLを作成します。
ファイルに横の+マークをクリック。HTMLをクリックします。

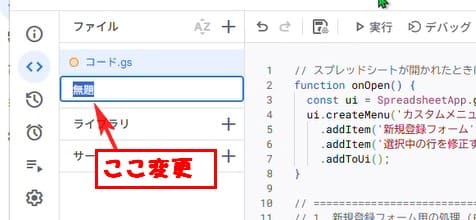
無題と書かれてるところにファイル名記載してます。
今回はForm.htmlファイル作成なので、Formと記入してクリックするとファイル作成がされるので、そこにコードを記入します。
Form.htmlに記入したコード
<!DOCTYPE html>
<html>
  <head>
    <base target="_top">
    <style>
      body {
        font-family: 'Helvetica Neue', Arial, sans-serif;
        padding: 10px;
        color: #333;
        background-color: #f9f9f9;
      }
      .form-group {
        margin-bottom: 12px;
      }
      label {
        display: block;
        margin-bottom: 4px;
        font-weight: bold;
        font-size: 14px;
      }
      input[type="text"], input[type="password"] {
        width: 100%;
        padding: 8px;
        box-sizing: border-box;
        border: 1px solid #ccc;
        border-radius: 4px;
        font-size: 14px;
      }
      input[type="text"]:focus, input[type="password"]:focus {
        border-color: #4D90FE;
        outline: none;
      }
      .button-group {
        display: flex;
        justify-content: flex-end;
        gap: 10px;
        margin-top: 20px;
      }
      button {
        padding: 10px 15px;
        font-size: 14px;
        border: none;
        border-radius: 4px;
        cursor: pointer;
        font-weight: bold;
      }
      .btn-submit {
        background-color: #4CAF50;
        color: white;
      }
      .btn-submit:hover {
        background-color: #45a049;
      }
      .btn-update {
        background-color: #008CBA;
        color: white;
      }
      .btn-update:hover {
        background-color: #007B9A;
      }
      .btn-cancel {
        background-color: #f1f1f1;
        color: #333;
      }
      .btn-cancel:hover {
        background-color: #ddd;
      }
    </style>
  </head>
  <body>

    <form id="inputForm">
      <div class="form-group">
        <label for="chromeId">ID(chrome名)</label>
        <input type="text" id="chromeId" name="chromeId">
      </div>

      <div class="form-group">
        <label for="address">アドレス</label>
        <input type="text" id="address" name="address">
      </div>

      <div class="form-group">
        <label for="password">パスワード</label>
        <input type="text" id="password" name="password">
      </div>

      <div class="form-group">
        <label for="info">登録情報</label>
        <input type="text" id="info" name="info">
      </div>

      <div class="form-group">
        <label for="recoveryAddress">再設定アドレス</label>
        <input type="text" id="recoveryAddress" name="recoveryAddress">
      </div>

      <div class="form-group">
        <label for="location">使用場所</label>
        <input type="text" id="location" name="location">
      </div>

      <div class="button-group">
        <button type="button" class="btn-cancel" onclick="google.script.host.close()">閉じる</button>
        <button type="button" class="btn-submit" onclick="submitForm('add')">新規追加</button>
      </div>
    </form>

    <script>
      function submitForm(actionType) {
        var form = document.getElementById('inputForm');

        // 必須入力(ID)のチェック
        if (!form.chromeId.value) {
          alert('ID(chrome名)は必須項目です。');
          return;
        }

        if (actionType === 'add') {
          // 【新規追加】のGAS関数を呼び出す
          google.script.run
            .withSuccessHandler(function() {
              form.reset(); // ポップアップなしでクリア
            })
            .withFailureHandler(function(err) {
              alert('エラーが発生しました: ' + err.message);
            })
            .addNewRow(form);

        } else if (actionType === 'update') {
          // 【選択行を修正】のGAS関数を呼び出す
          google.script.run
            .withSuccessHandler(function() {
              form.reset(); // ポップアップなしでクリア
            })
            .withFailureHandler(function(err) {
              // 見出し行などを選んでいた場合は、GAS側から返ってきたエラーをポップアップで表示します
              alert(err.message);
            })
            .updateSelectedRow(form);
        }
      }
    </script>
  </body>
</html>
同じ手順でEditForm.htmlファイルも作成します。
EditForm.htmlに記入したコード
<!DOCTYPE html>
<html>
  <head>
    <base target="_top">
    <style>
      body { font-family: sans-serif; padding: 15px; background-color: #f3f4f6; }
      .form-group { margin-bottom: 12px; }
      label { display: block; font-weight: bold; margin-bottom: 4px; font-size: 13px; }
      input { width: 100%; padding: 8px; box-sizing: border-box; border: 1px solid #ccc; border-radius: 4px; }
      .footer { margin-top: 20px; text-align: right; }
      .btn-save { background-color: #3b82f6; color: white; border: none; padding: 10px 20px; border-radius: 4px; cursor: pointer; font-weight: bold; }
      .btn-save:hover { background-color: #2563eb; }
      .row-info { color: #6b7280; font-size: 12px; margin-bottom: 10px; }
    </style>
  </head>
  <body>
    <form id="editForm">
      <div class="row-info">修正対象: 第 <?= rowNum ?> 行</div>
      <input type="hidden" name="rowNumber" value="<?= rowNum ?>">

      <div class="form-group">
        <label>ID(chrome名)</label>
        <input type="text" name="chromeId" value="<?= rowData[0] ?>">
      </div>
      <div class="form-group">
        <label>アドレス</label>
        <input type="text" name="address" value="<?= rowData[1] ?>">
      </div>
      <div class="form-group">
        <label>パスワード</label>
        <input type="text" name="password" value="<?= rowData[2] ?>">
      </div>
      <div class="form-group">
        <label>登録情報</label>
        <input type="text" name="info" value="<?= rowData[3] ?>">
      </div>
      <div class="form-group">
        <label>再設定アドレス</label>
        <input type="text" name="recoveryAddress" value="<?= rowData[4] ?>">
      </div>
      <div class="form-group">
        <label>使用場所</label>
        <input type="text" name="location" value="<?= rowData[5] ?>">
      </div>

      <div class="footer">
        <button type="button" class="btn-save" onclick="submitForm(this.parentNode.parentNode)">修正を反映する</button>
      </div>
    </form>

    <script>
      function submitForm(formObj) {
        google.script.run
          .withSuccessHandler(function() {
            google.script.host.close(); // 完了したら閉じる
          })
          .saveEditedRow(formObj);
      }
    </script>
  </body>
</html>

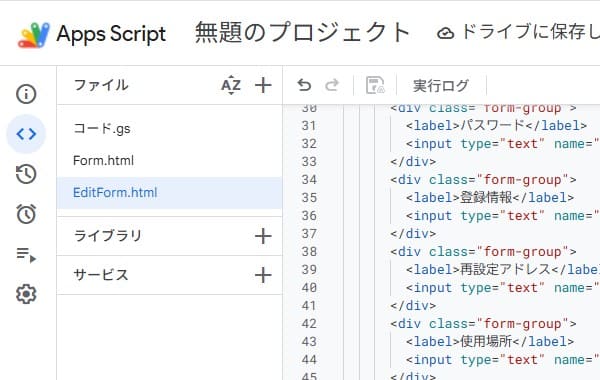
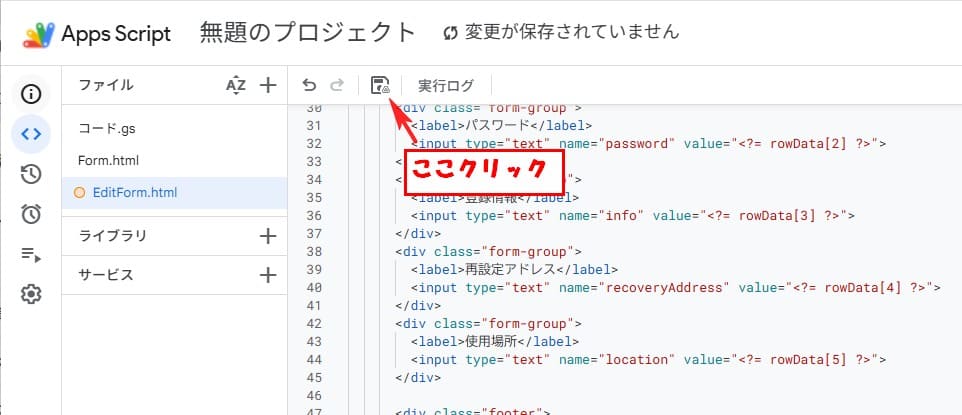
ファイルの作成ができたら、保存ボタンをクリックします。
最初はGoogleの認証画面が出てくるので認証すると使用可能になります。




YouTube動画